Sunday, April 27, 2014

My Style Curry Chicken

And so I bought a kampong chicken with the intention of doing rice-cooker chicken. But the hubby fell sick, and I thought a healthy chicken soup may be better for him. Then again, I doubt he has the appetite to eat much. Hence, I used half to prepare a My-Style Chicken Curry since I conveniently found a pack of pre-mix, lemongrass and coconut milk. Well, the advantage of storing up. Lol

Ingredient:
- chicken (any parts basically)
- potatoes halved or quartered. 
- pre-mix curry paste
- lemon grass one stalk, cut into 3 parts and smashed 
- sugar and salt


Steps:

1.  Fry the potatoes into golden brown and set aside. This helps to retain the shape and prevent softening when boiled with the curry. 

2. Using 3 tbsp of the balance oil, add in lemon grass to fry till aromatic. Add the chicken and continue to fry for at least 5-8mins using medium fire. The purpose to is allow the meat to be semi cooked. 


3. When the chicken turn white (only the surface is cooked. The meat is actually still raw), add in the curry paste and continue frying. Add in more oil if drying. Keep frying till the curry paste releases aroma. When aromatic, add in the potatoes and continue frying. 


4. Add in half the coconut milk and continue frying. You may add half cup of water now. Continue to stir fry. 


5. When liquid becomes thicker, add in the about 4 cups of water (you can determine the amt depending on your chicken meat). Keep frying and stirring to prevent the bottom batch from being burnt, for about 15mins on medium fire.


6. Turn to small fire and let the curry simmer for another 10mins to ensure the meat's cooked.  Off fire and serve with your favourite bread/rice. 


Happy currying!

Happy mum 

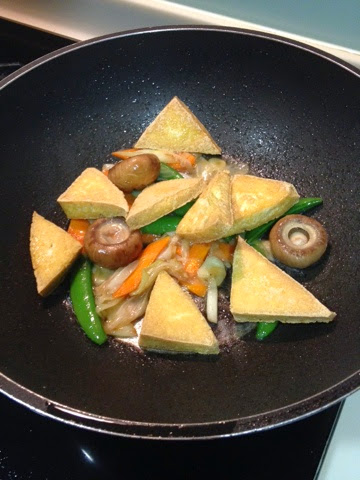
Braised Beancurds (鱼香烩豆干)

Toufu and tau kwa, both are our family's favourite. High in nutrition and easy on the pockets. And hence i added this dish on our dining table tonight. The kids love the savory gravy and I love the flavors-infused tau kwas. 

Ingredients:
- square tau kwa, cut into 4 triangles and halved to become thinner
- snow beans (amt up to u. I used abt 7)
- carrots slices
- China leeks (cut diagonal into 1 or 1.5inches long)
- corn starch (for thickening gravy)
- chopped garlic
- mushrooms (any type)

Sauce:
- 2 tbsp oyster sauce
- 1 tbsp concentrated chicken stock
- 1 tsp sesame oil
- 1 tsp light soy sauce
- half cup water


Steps:
1. Heat the frying pan with oil (enough to cover half the tau kwa) to semi hot. The oil should not be too hot as the tau kwa may brown too quickly or burnt. As a litmus test, u can drop one slice into the warm oil and small bubbles should be seen. 


2. When frying, take out a small pot to boil some water. When boiling, throw in the snow beans, some oil (use from the frying pan) and pinch of salt to blanch for a minute. This is to rid the raw taste in the snow beans. 


3. When the fragrance of the tau kwa surfaced, that's when you can gently flip them to the other side. You should see a nice brown colour. Dish up and set aside. Pour out excess oil into a bowl, leaving about a tbsp worth in the pan. 


4. Add in the other ingredients in this order: leeks and garlic, mushroom, carrots and snow beans and fry. Add some water. 


5. Add in the tau kwa. Note: do not fry them yet. You don't want to break your tau kwa although they are hardier than toufu. 


6. Add in the half cup of water follow by the sauce. You can now either use your spatula to stir the mixture, still not "disturbing" the tau kwa. Or, u can train your wrist power by swirling the pan so that the mixture inside is mixing well. 


7. Leave it to braise over medium heat for about 5 mins. The gravy will start to reduce as they get infused into the tau kwa. Gravy will also start to thicken a little thou still looks thin. 


8. At this point, OFF the fire. Using a fork, gently stir the corn starch mixture and drip the mixture into the pan. Swirl the pan very slightly. Once done, u may start the fire again, simmer for another 45secs and you may dish up. 

You may ask, why off the fire before adding corn starch? The starch is just a thickening agent. We don't want to cook it (as in over fire) as that may alter the taste. 


Enjoy this over steamed rice or plain porridge. 

Happy mum 


Tuesday, April 22, 2014

Thai Style Spicy Lime Seabass

IIt's been weeks since I am back from Bangkok and I am still having the post-bangkok blues. And the hubby has been craving for our favourite Thai dish, the spicy lime seabass. Naturally I have to create this lovely dish. I have previously done up this dish before and it was 70% close and I am trying to achieve a 90marks for this round. Good that I have a Thai friend who shared her own recipe for this dish. Using her recipe as reference, I did it slightly differently. 

Ingredients:
- seabass
- 2 stalks of lemon grass (thinner portion 1cm diagonally chopped, thicker portion chopped into halves and smashed)
- chopped garlics (about 1 full clove)
- chopped ginger
- 2 limes (juice)
- 2 chilli padi (chopped)
- pinch of salt
- fish sauce 
- shaoxing wine


Steps:
1. Prepare the broth first. Using a small pot, boil about 1 cup of water. Using a frying pan, add oil and stir fry the following in this order: thicker lemongrass, ginger, garlic. Allow the individual aroma to be released each time before adding the next ingredient. Add the boiling water into the wok to simmer. Add in 2 tbsp of fish sauce. Let it simmer a while before transferring to the pot to further boil over small to medium heat. Add the chopped chilli into the broth. I did not fry the chilli together as I do not want the broth to be too spicy till the rest of the flavour are masked. 


2. While the broth is boiling, let's prepare the fish. To allow faster and even cooking, I make slits at the back of the fish separating the fish meat and the fin bones. Placed a slice of ginger each in the slit. Stuff some chopped lemongrass and ginger into the fish stomach. 


3. Prepare the steamer. 

4. Place the seabass on the plate, marinate with salt on both sides, and pour 1tsp of shaoxing wine over it. Next sprinkle the lemongrass, chilli and remaining garlic over the fish. Send the fish into the steamer for 15mins. 


5. While 5 mins into steaming, open the cover and pour the broth and lemongrass stalks into the plate and continue steaming for 10 more mins. 


6. Pour the lime juice over the fish. I did not cook the lime juice in the broth as over cooking will cause the juice to turn bitter and not sour. Adding the lime juice last enhances the refreshing sour taste. 

7. Ready to serve. You may add garnishing at this stage. I skipped that cos we were too eager to tuck in. :)


Happy seabassing!


Happy mum

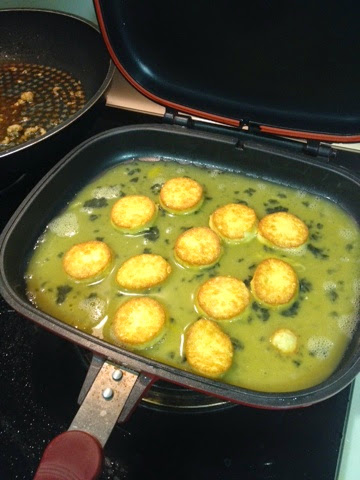
Happy Call HotPlate toufu

I was so excited that finally after a long time, I can use my HappyCall pan for some decent cooking yet again. Have been using the HappyCall diamond series and neglected the HCP. 

What best dish to whip up using the HCP? It has to be the Hotplate toufu!  Note: I used a frying pan for general cooking and the HCP for the last touch. 

Ingredients:
- minced meat marinated (refer below marinade)
- one tube of egg toufu sliced into circles
- 2 eggs, beaten Into a mixture. Add salt and pepper. 
- sliced carrots 
- chopped garlic and spring onions
- any other ingredients (prawns, mushrooms, etc)
- sauce (refer below)

Marinade for minced meat:
- a pinch of salt
- a tsp of light soy sauce
- a a tsp of sesame oil 

Sauce:
- 3 tbsp of oyster sauce
- 1 tbsp of Abalons sauce (optional)
- 1 tsp of Shaoxing wine
- 3 tbsp of water/stock


Steps:

1. Pan fried the toufu till brown. Dish out and set aside. Strain the oil and set aside. 


2. Using about 1tbsp of leftover oil, add in chopped garlic and carrot to stir fry. Add in mince meat and stir fry fast. Add in 1tbsp of water and loosen the mince meat. 


3. Add in the sauce mixture and stir fry all the ingredients. 


4. While the ingredients are being cooked, use 1 tsp of leftover oil, coat the HCP. Then pour the egg mixture into the pan. The HCP should not be heated up yet else the egg will be overlooked. Take note at this time, to off the fire for the meat and sauce. 


5. Arrange the toufu onto the bed of egg mixture. 


6. Pour the meat and sauce over the Toufu and the egg bed. Take note only after that, then to turn on the stove. As the HCP gets heated up very fast, if the fire was turned on much earlier, the egg would have become too cooked by the time the Toufu and meat are arranged in the HCP. 

 
7. You can add in a little more oyster sauce if you want a darker brown look. Close the lid and cooked for another 2 mins more over medium fire. Open the lid and add chopped spring onions and you are ready to serve. 


Happy hotplating!

Happy mum


Sunday, April 20, 2014

Grilled Stuffed Squid

during the weekday evenings, the helper at home usually cooks the same few dishes that consist of fish, chicken, veg and pork rib soup. So when I takeover the kitchen during the weekend, I try to do up new dishes. So here it is, something different on the dining table - grilled stuffed squid. 


Ingredients;
- small squids with heads removed and inside cleaned (abt 3inches length?) (refer below marinade)
- minced meat (refer below marinade)

Marinade for squid:
- dark soy sauce 
- chilli powder (a pinch)
- salt (a pinch)

Marinade for minced meat:
- 1 tsp of sesame oil
- 1 tsp of light soy sauce 
- a pinch of salt

Steps:
1. Marinate the squid with the above marinade and set aside. 

2. Marinate the minced meat fillings with the above marinade. 

3. Heat up a flat pan with some oil. Throw in the mince meat and give a good stir fry. When meat turns slightly cooked (abt 70%) or meat turns white leaving some uncooked portion, add in very little (abt 2 tbsp) water or some chicken stock to give a good simmer. Dish and set aside. 

Tip: do not over cook nor undercook the meat as the former will cause the meat to be hard and the latter when added into the cavity of squids, will remain uncook as squids tend to cook fast.  

4.  Stuff the meat fillings into the marinated squids. 

Tip: to avoid spillover of fillings, do not over stuff the squids. 

5. Preheat the flat pan with oil with medium fire. When hot, add in the stuffed squids, wings down first.  That will take ard 3mins

6.  When the wings curled slightly, turn over the squid and continue grilling for abt 1 min or so. 

7.  Drench the squids with the reminder marinade from the squids and simmer another 1 min or so. 

8. Dish to serve. 


Happy grilling


Happy mum


Saturday, April 19, 2014

Fried Carrot Cake


II am trying to go "economical" while enjoying my passion in cooking. At the same time, need to ensure the kids at home are not being compromised in terms of what they like to eat or the a healthy diet. Hence today, it's the healthier version of the unhealthy hawker food for their brekkie - carrot cake. 

Ingredient:
- pre-packed carrot cake (sorry, too lazy to attempt making one) chopped into strips
- 2 eggs
- chopped garlic
- dark soy sauce
- pinch of salt
- chye poh (optional)
- chilli sauce (optional)


Steps:
1. Heat the flat pan with oil and when got, add in the chopped garlic and fry till aromatic. Take care nt to brown the garlic. 

2. Add in the strip carrot cake and pan fry for abt 2 mins before using ur spatula to dice the long strip carrot cakes into cubes. Continue to fry, ensuring the oil coats the carrot cakes. Add in dark soy sauce (amt to your own desire)


3. When the carrot cakes are slightly dried and crispy, pour the egg mixture over the surface. Do not stir yet, till the mixture is about 50% cooked. Then using your spatula, fry the egg and carrot cakes well. 


4. Dish and serve with garnishings like chopped spring onions or parsley. 


Happy Saturday!

Happy mum

Monday, April 7, 2014

Thai-style Claypot Vermicelli Prawn

After a short 3d2n trip to BKK, I am figuring my next few dishes will be quite Thai-like.  Good for the husband and myself since we both enjoy thai food.  So, first on the menu will be Thai Style Vermicelli Prawns.  Before whipping up this dish, I contemplated very hard to just make my life easier by getting the pre-mix.  But, I cant get past myself by taking this short-cut.  Its not challenging enough.  LOL!  I thought, even if its not nice, it will at least be edible.  So, challenge accepted.  :P

Ingredients:
- 5 Medium Size prawns (devein and marinate with pinch of salt)
- Vermicelli (amt up to you, but must at least cover your claypot base)
- Cloves of garlic
- Ginger (chopped to about 5 cubes)
- Galangal (chopped to about 5 cubes)
- Red Onions (abt 2 pieces)
- Spring Onions (chopped into 2 inches, separate the greens from the whites)
- Lemon grass (abt 4 inch length, chopped diagonally into 1cm length, to release the fragrance)


Sauce:
- 1 tbsp. Oyster Sauce
- 2 tbsp. light soy sauce
- 1/2 tsp dark soy sauce
- 1 tbsp. Shaoxing Wine
- 1 tsp Thai Fish Sauce
- 2-3 tbsp. of water (depending on ur vermicelli)
- a dash of Black Pepper Powder (you can use peppercorns too)
- a dash of Red Chilli Powder


Steps:
1. Soak the vermicelli in tap water for 10 mins and strain off the excess water.  Using a scissors, cut the vermicelli so that its more manageable.  Add the sauce into the vermicelli and mix well.


2. Heat up the claypot with oil.  Coat the base evenly with oil to prevent sticking.

3. Toss the following, following this order: Ginger cubes, Galangal cubes, Lemon Grass, Garlic, Red Onions and green spring onions.  Stir fry each item till slightly aromatic before adding the next item.


3. Add the vermicelli into the claypot.  Spread them to cover the base.  Excess sauce to be poured into the claypot to simmer.   Cover the  claypot.

4. Abt 3 mins later, open the lid, lay the prawns nicely on top of the vermicelli.  Cover the lid.


5. Abt 2 mins later, open the lid and lay the white spring onions over the vermicelli.  Cover the lid and simmer for another 2 mins.

6.  Off fire and you are ready to serve. 


Hope you will like this simple dish. 

Happy mum