Friday, January 16, 2015

Braised Ee Fu Noodles

Apparently 2 of the kids and myself are down with stomach flu this week.  I have been feeling nauseous and does not have much appetite.  Having chanced upon a picture of a home-cooked ee fu noodles, I thought this will be good to whet the appetite a bit.  Plus, I have never tried whipping this particular dish, so, its a "let's get working".

After doing up this dish, I think I will be cooking this with various ingredients subsequently as this is relatively easy, not time consuming as well as very economical.  The packet of 4 ee fu noodles cost $2.30, good enough for 3-4 servings.  Estimated cost for this dish is $5?  So economical!

Ingredients:
- a packet of 4 ee fu noodles
- 2 shiitake mushrooms (soaked, slice and set aside water for sauce)
- 1/2 or 1 can button mushroom (your desire)
- 1 packet golden mushrooms (I replace the usual chives with this)
- chopped garlics
- 1 tbsp cooking oil


Sauce:
- 3 spoons of oyster sauce
- 1 tbsp of light sauce
- 1 tbsp of dark sauce
- 1 tsp of sugar
- 1 tsp of salt
- 1 tsp of chicken powser
- 1cup of water


Steps:

1. Boil a pot of water and toss the noodles in.  Loosen the noodles and remove to drain when the water comes to a boil.  Run the noodles under tap water to stop the cooking.  Set aside.


2. Heat a pan with cooking oil.  Throw in the chopped garlic and stir fry till aromatic.  Add in the sliced shiitake mushrooms and button mushrooms to stirfry.


3. Add in the sauce and stir continuously to prevent charring.


4.  Gently introduce the cooked noodles in and give a good stir.  If the sauce is drying up, add in the mushroom water bit by bit and let the noodles continue braising.


5. Add in the golden mushroom last and continue to stir fry.  When the golden mushroom has soften a little, it is ready to dish.


* Why do I add the golden mushroom last?  I realised that if we add the golden mushroom too early, the texture will become overly soft and slime-y.  Also, the golden mushroom when braised too long, with produce some sticky substance, causing the gravy to thicken.


Happy Braising!


Happy mum

Tuesday, January 13, 2015

Korean Style seasoned Mung Bean Sprouts / Sukju Namal

Recently, the husband and me had a good ramen session at one of the outlet at Suntec. There was only one reason and one compelling thought in my mind when leading him to dine there. It was the Korean style Sukju Namal (seasoned mung bean sprouts) that I have been thinking about. It was served in a jar, free for consumption, like an appetizer. It is simply very addictive munching an chatting. It was a simple yet mind-blowing appetizer that tickled and made the taste buds happy!  And so, I decided to do up the same dish at home. 

Ingredients:
- mung beans sprouts (washed)
- 1 tsp sesame oil
- 1 tsp light soya sauce 
- roasted black sesame (I added white ones too)
- salt
- bowl of ice water 


Steps:
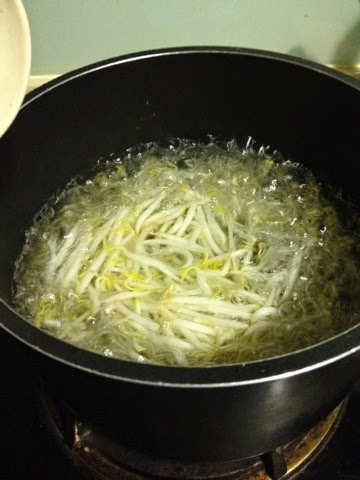
1. Boil a pot of salt water and toss the mung bean sprouts when the water comes to a boil for 8 mins. While cooking, prepare a bowl of water with ice cubes. Set aside. 


2. Scoop the mung beans sprouts and submerge totally into the ice water. This is to stop the cooking process totally. 


3. Drain and towel dry the sprouts after 2 mins. Set aside in a tossing bowl. 


4. Sprinkle some salt and 1 tsp of sesame oil and 1 tsp of light soya sauce and mix well. 


5. Mixed in the roasted black (and white) sesame and continue to mix well. 


6. Transfer to a serving bowl and you are ready to munch!


I did this again some days after and decided to store the sprouts in jars and refrigerate them. Anytime I feel like munching, I will just open a jar and make myself happy.  


Happy mixing!

Happy mum

Sunday, January 11, 2015

Seaweed Rolls

Since the kids love seaweeds so much but I always worry about the sodium level, and since I have successfully tried out the lotus roots chips, I decided to combine the poh piah skin with the seaweed. 

Ingredients:
- sheet of seaweeds
- poh piah skin (I got around 200g from the wet market. Would think the supermarket do sell the prepack ones too)
- egg mixture/butter/corn flour mixture for sealing


Steps:
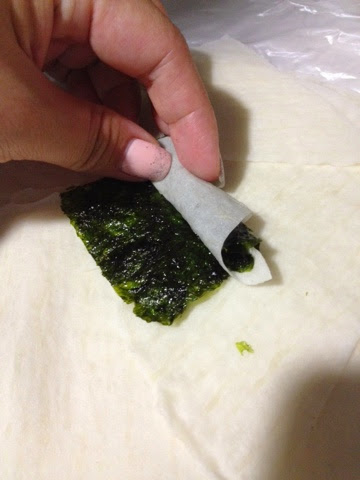
1. Trim the Poh piah skin into cone shape. You can also use your creativity to do up various shapes. 


2. Place a sheet of seaweed on the trimmed skin and start rolling from the widest point inwards to the sharpest point.  Use the mixture to seal the sharpest point well. 


3. Place the rolls into the Airfryer basket and set to 200 degrees for 3 - 5 mins.


 Happy airfrying again!

Happy mum

Lotus Root Crispy Chips

It's been such a long long time since I stepped into the kitchen to cook/meddle/chill/nua. It's the PSLE-fever for me since last December co the son is going for the much dreaded exam this year.  I can feel myself going gaga- and hence decided that I need a break away from the revisions.  Since the CNY is approaching, and I am pretty reluctant to spend money to buy some of my favorite snacks, hence, decided to try out in the kitchen, the much-loved Lotus Root Crispy Chips. 

Ingredients:
- lotus roots sliced finely (approx. 2mm thick)
- one tsp of olive oil
- pinch of salt 


Steps:
1. Slice the root to approx 2mm thickness 


2.  Dab the sliced roots dry using kitchen towels.  This will prevent the slices from being soggy. 


3. Sprinkle some salt and drizzle some Olive oil over the slices. Mix well. (Using Airfryer, there's no need to use oil but for the extra feel, I added olive oil)

4. Toss the slices roots into the Airfryer and set to 200degrees and airfry for 12 minutes.  Every 1 min, open the Airfryer and using a long chopstick or tong, gently stir or loosen the chips to allow even browning. 

5.  Set aside to cool. 


Happy air frying!

Happy mum