Sunday, March 15, 2015

Claypot Fish Head

I think I have covered this dish before but as I have used new seasonings and added other ingredients this round, i thought I will blog it down as well. Between this and the last one I blogged, the family preferred today's. 

Ingredients:
- grouper fish head (wash and pat dry)
- corn flour (to powder the fish head)
- roast pork
- long white cabbage (chopped into big pieces)
- cauliflower
- yam (sliced into semi circle)
- bean curd (chopped into rectangular cubes)
- carrot (sliced)
- garlic (chopped)
- ginger (approx. 5-6 slices)
- spring onion (chopped only the white parts)
- others (basically to ur likings. I added Japanese fish cake, crab sticks etc for the kids)


Sauces:
- fish sauce (abt 1 tbsp)
- scallop sauce (abt 1 tbsp)
- oyster sauce (abt 2 tbsp)
- pinch of salt (taste to test the saltiness)
- cornstarch (for thickening)
- water


Early preparation works:
Before we can start cooking, some of the ingredients need to be prepared in advance, like the fish head, bean curd and yam. 

1. Fry the sliced yams and set aside. 

2. Using same oil, fry the bean curds and set aside. 

3. While frying, pat some salt onto the Fishhead and then powder the fish head with corn flour. Set aside for deep frying. 

4.  Once yam and bean curds are ready, pour out the oil and set aside for later use. Add in new oil for deep frying of Fishhead. 

5. Using medium fire, when the oil starts to get hot, (note: not booking), add in the fish head into the oil, with the outer skin facing up. 


6. Using a tong, flip the fish head over after 7mins. Continue to fry again till the fish meat shows traces of brown. Set aside when done. 


At this point, preparation work is over. The actual cooking starts here:


Steps: 
1. Heat the clay pot with 2tbsp of the remaining oil leftover from frying of yam and bean curd. Add in the spring onion, chopped garlic and sliced gingers. Fry till aromatic. 


2. Add in carrot and cauliflower and give a good fry for about 5mins. Add in 1 bowl of water and continue stirring. 

3. Add in the scallop, oyster sauce and the fish sauce. Stir well over high heat. Add a pinch of salt to taste. It should not be too much. We can always add in more towards the end. 


4. Add in the white cabbage. 


5. Add in the bean curd.


6. Add in the roast pork and the Japanese fish cake. 


7. Create a well by pushing the rest of the ingredients to the wall. Gently place in the fried fish head and let it simmer for about 3 mins.

Stir in some cornstarch to thicken the gravy. If the sauce is not salty, add in some salt to enhance the taste. Do rem, saltiness can cause bad health effects. 


8. Add in the crab stick, fried yam and the spring onion last. Close lip to simmer for another 2 min. Off fire, add garnishing and serve. 


Here's the finished product :

Hope you guys will like this one-pot dish. :)

Happy mum

Sunday, March 1, 2015

Wongbok Seafood Pork Wraps

GONG HEI FATT CHOY!


hoooohooo.... so I have been busy and lazy.  Its the CNY and its also the pigging out season.  After all the shabu shabus, the luxurious abalone meals, its time to return to something simpler.  But since its still within the CNY period, lets do up something interesting using simple ingredients.

I am using pork ribs and the broth for this.  As the broth used for this dish is actually only about a small bowl worth but I do not want to waste the time and effort, I actually prepared more broth and pork ribs.  The balance meat and broth, I used them to cook porridge for the next meal.  That's like another meal/dish on its own.

Ingredients:
- Pork Ribs Broth (boiled for 1.5hrs or until pork ribs are tender)*
- Pork Ribs (you may substitute for loin meat too, but ribs meat are softer)*
- Yellow Onion (quartered and add into the broth)
- Crabsticks*
- Carrots (shredded)*
 - Spring Onion (chopped lengthwise, approx. 1inch)*
- Scallop Concentrated Sauce (1 tbsp)
- Wongbok (long white cabbage leaves) - leave the leaves in their original forms.

* for the above that I had asterisked, it is really up to you to decide what you wanted to have in your rolls.  Some suggestions: prawns, pork/chicken mince meat,fish paste, scallops etc.  The possibilities are endless.  Let your creativity flows! :)

Steps:
1. Boil the pork ribs, add in the chopped onions.  Boil till the meat are soft.  Estimated 1 hr.  Do not add salt.  Sieve out the pork ribs, remove the bones, slice the meat into chunks.  Set aside.

2. While boiling the pork ribs, set to work on the wongbok.  Using a wide pan, boil with water.  Gently add in the leaves and let it blanched for about 2-3 mins.  Sieve to dry.  Do be gentle with the leaves so as not to break/tear them as they are pretty soft at this stage.

3. Lay the leaves on a clean work station.  Add in one chunk of pork, carrot shreds, spring onion at the thickest part of the leaves, i.e. the stems.  Start to roll inwards.  Continue the next leaf with crabstick, spring onion and carrot shreds.

4. Place the wraps onto a plate and arrange nicely. 

5.  Prepare the Steamer.

6. Using another pan, scoop 1 ladle of pork broth (unsalted still) into the pan.  Add in the scallop concentrate and bring to a simmer.  When the stock starts bubbling, pour over the wraps.  You can now send the plate of Wongbok into the steamer.

7.  Steam for 6 mins.

8. Dish, garnish and serve.


Happy steaming!
Happy mum


Friday, January 16, 2015

Braised Ee Fu Noodles

Apparently 2 of the kids and myself are down with stomach flu this week.  I have been feeling nauseous and does not have much appetite.  Having chanced upon a picture of a home-cooked ee fu noodles, I thought this will be good to whet the appetite a bit.  Plus, I have never tried whipping this particular dish, so, its a "let's get working".

After doing up this dish, I think I will be cooking this with various ingredients subsequently as this is relatively easy, not time consuming as well as very economical.  The packet of 4 ee fu noodles cost $2.30, good enough for 3-4 servings.  Estimated cost for this dish is $5?  So economical!

Ingredients:
- a packet of 4 ee fu noodles
- 2 shiitake mushrooms (soaked, slice and set aside water for sauce)
- 1/2 or 1 can button mushroom (your desire)
- 1 packet golden mushrooms (I replace the usual chives with this)
- chopped garlics
- 1 tbsp cooking oil


Sauce:
- 3 spoons of oyster sauce
- 1 tbsp of light sauce
- 1 tbsp of dark sauce
- 1 tsp of sugar
- 1 tsp of salt
- 1 tsp of chicken powser
- 1cup of water


Steps:

1. Boil a pot of water and toss the noodles in.  Loosen the noodles and remove to drain when the water comes to a boil.  Run the noodles under tap water to stop the cooking.  Set aside.


2. Heat a pan with cooking oil.  Throw in the chopped garlic and stir fry till aromatic.  Add in the sliced shiitake mushrooms and button mushrooms to stirfry.


3. Add in the sauce and stir continuously to prevent charring.


4.  Gently introduce the cooked noodles in and give a good stir.  If the sauce is drying up, add in the mushroom water bit by bit and let the noodles continue braising.


5. Add in the golden mushroom last and continue to stir fry.  When the golden mushroom has soften a little, it is ready to dish.


* Why do I add the golden mushroom last?  I realised that if we add the golden mushroom too early, the texture will become overly soft and slime-y.  Also, the golden mushroom when braised too long, with produce some sticky substance, causing the gravy to thicken.


Happy Braising!


Happy mum

Tuesday, January 13, 2015

Korean Style seasoned Mung Bean Sprouts / Sukju Namal

Recently, the husband and me had a good ramen session at one of the outlet at Suntec. There was only one reason and one compelling thought in my mind when leading him to dine there. It was the Korean style Sukju Namal (seasoned mung bean sprouts) that I have been thinking about. It was served in a jar, free for consumption, like an appetizer. It is simply very addictive munching an chatting. It was a simple yet mind-blowing appetizer that tickled and made the taste buds happy!  And so, I decided to do up the same dish at home. 

Ingredients:
- mung beans sprouts (washed)
- 1 tsp sesame oil
- 1 tsp light soya sauce 
- roasted black sesame (I added white ones too)
- salt
- bowl of ice water 


Steps:
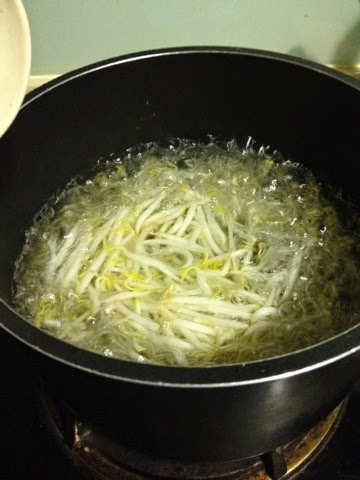
1. Boil a pot of salt water and toss the mung bean sprouts when the water comes to a boil for 8 mins. While cooking, prepare a bowl of water with ice cubes. Set aside. 


2. Scoop the mung beans sprouts and submerge totally into the ice water. This is to stop the cooking process totally. 


3. Drain and towel dry the sprouts after 2 mins. Set aside in a tossing bowl. 


4. Sprinkle some salt and 1 tsp of sesame oil and 1 tsp of light soya sauce and mix well. 


5. Mixed in the roasted black (and white) sesame and continue to mix well. 


6. Transfer to a serving bowl and you are ready to munch!


I did this again some days after and decided to store the sprouts in jars and refrigerate them. Anytime I feel like munching, I will just open a jar and make myself happy.  


Happy mixing!

Happy mum

Sunday, January 11, 2015

Seaweed Rolls

Since the kids love seaweeds so much but I always worry about the sodium level, and since I have successfully tried out the lotus roots chips, I decided to combine the poh piah skin with the seaweed. 

Ingredients:
- sheet of seaweeds
- poh piah skin (I got around 200g from the wet market. Would think the supermarket do sell the prepack ones too)
- egg mixture/butter/corn flour mixture for sealing


Steps:
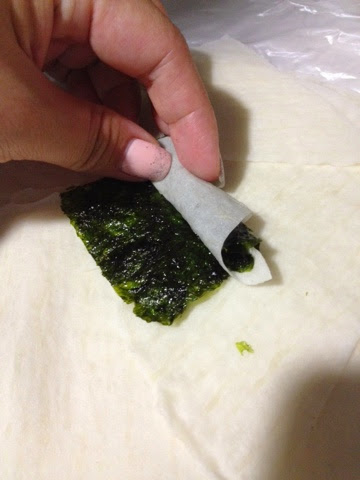
1. Trim the Poh piah skin into cone shape. You can also use your creativity to do up various shapes. 


2. Place a sheet of seaweed on the trimmed skin and start rolling from the widest point inwards to the sharpest point.  Use the mixture to seal the sharpest point well. 


3. Place the rolls into the Airfryer basket and set to 200 degrees for 3 - 5 mins.


 Happy airfrying again!

Happy mum

Lotus Root Crispy Chips

It's been such a long long time since I stepped into the kitchen to cook/meddle/chill/nua. It's the PSLE-fever for me since last December co the son is going for the much dreaded exam this year.  I can feel myself going gaga- and hence decided that I need a break away from the revisions.  Since the CNY is approaching, and I am pretty reluctant to spend money to buy some of my favorite snacks, hence, decided to try out in the kitchen, the much-loved Lotus Root Crispy Chips. 

Ingredients:
- lotus roots sliced finely (approx. 2mm thick)
- one tsp of olive oil
- pinch of salt 


Steps:
1. Slice the root to approx 2mm thickness 


2.  Dab the sliced roots dry using kitchen towels.  This will prevent the slices from being soggy. 


3. Sprinkle some salt and drizzle some Olive oil over the slices. Mix well. (Using Airfryer, there's no need to use oil but for the extra feel, I added olive oil)

4. Toss the slices roots into the Airfryer and set to 200degrees and airfry for 12 minutes.  Every 1 min, open the Airfryer and using a long chopstick or tong, gently stir or loosen the chips to allow even browning. 

5.  Set aside to cool. 


Happy air frying!

Happy mum

Sunday, November 2, 2014

Teo Chew Steamed Fishcake

I was itching to try new dishes yet was too lazy to go into a battlefield in my kitchen, creating complicated dishes. Also, going healthy is one of the food concepts in the mind recently. Hence when I chanced upon a recipe for my favourite Teo Chew steamed fish cake (潮州蒸鱼饼), I decided to give it a try.  The verdict was : you did this yourself? :)

Ingredients:
- 400g fish paste (I got the bobo brand 200g x 2 tubs)
- 250g minced meat
- chopped spring onions (amount to your desire)
- chopped red chilli (optional)
- 1 tbsp corn flour
- dash of pepper
- dash of salt

Steps:
1. Mix the ingredients above well into a paste.

2. Coat a big metal plate with a little oil and add in about 2 tbsp of water.  Set aside. 

Notes: The oil will prevent the fish cake from sticking too much. I added water so that I can use the "stock" for my other dishes. :)

3. Get ready a bowl of water and a spoon. 

4. Start scooping the paste and shaping into your desire designs. Once done, place your fishcake onto the plate. 

Notes:  As the paste is rather sticky, you can dip your spoon into the bowl of water before u scoop the paste. The wet spoon will prevent the paste from sticking too much. 

5. Once done, send into the steamer for steaming for 20mins. If you have crafted into bigger pieces, you will need about 25 mins. 

6. To check for doneness, poke a fork into the fishcake. If the fork comes out clean with no residues, the fish cake is ready. 


Happy caking!

Happy mum